Quick guide for CyberSource Pay-by-link
Overview:
Pay by Link is an easy and fast way to sell products or accept donations without any coding. The Pay by Link service enables you to create a secure Cybersource hosted payment page. You can share the secure payment page with your customers from a link, checkout button, and QR code to accept online payments using credit cards and debit cards. Customers click on your payment link, checkout button, or QR code and a secure Cybersource hosted payment page opens where they enter payment and shipping information.
Quick guide
1. Login:
Alternatively, if you can not remember the above link, you
can find the Login menu from:
Then, Login >> Global
Fill your Organisation ID and username:
In the next step,
CyberSource will send an OTP to your registered email address, click on
“Email…” button:
Passcode could be found in your email. Fill it into the box:
2. Access:
From the Homepage, find Invoicing in the left menu:
>>> Visit
Manage Invoices
3. Setting (Optional):
Typically, you this is one-time setup
>>> Click “Settings”
>>> Click “Settings”
There will be various settings, and the most important one
is “Branding”, which includes:
- Business Name
- Invoice Logo (optional)
- Brand color (optional)
- VAT number (optional)
- Currency: required to change to AUD (default =
USD, which is non functional)
CyberSource provides a Preview section, just click on any
space in the page to see your new changes.
Example:
Checkout page setting (optional):
- Configure Custom Post-Transaction Redirection for Payment Links
- You can customize the payer experience by redirecting customers to specific web pages after a Pay by Link transaction completes. Specify different destination page URLs for successful, declined and pending payments. The redirect occurs immediately after payment processing but before the receipt page loads. Customers still receive email notifications with receipt links, and Webhook notifications continue to function normally.
- When custom redirect URLs are not specified, the system continues to use the default payment response pages.
- Newly configured redirect URLs apply to both new and existing payment links.
3 options:
- Payment Success URL: The URL of the page to display after a successful transaction
- Payment Failure URL: The URL of the page to display after a failed transaction.
- Payment Pending URL: The URL of the page to display for a pending transaction.
Note:
- Once save the settings, you can revisit this
menu to update later.
- If you changed the setting after you sent the invoicing link to your customer, your customer might not see the new change (for example: new logo/ colour) as it might take a few minutes for the update. Your customer is advised to reload (F5) their web browser.
4. Create Payment Link:
On the left menu: visit > Pay by Link >> Manage
Links
>>> click “Create pay by link” for the 1st
usage:
You need to fill all the details for A new payment link consists of this information:
Part 1: Select the payment link type:
- Pay by Link type: fixed price or customer-set price.
- Fixed price: select this option if you are selling an item or service with a set price.
- Customer-set price: select this option if the customer chooses the payment amount.
Part 2: Item details
2.1. Enter the item details for a fixed price product or service:
- Item name
- Description (optional)
- Price
- Max quantity: the maximum allowable quantity for each purchase. The default value is 1.
example:
2.2. Enter the item details for a product or service with a customer-set price:
- Item name
- Description (optional)
- Min amount: the minimum amount you will accept for each transaction. Click Change to enter a value other than the default suggested value of $1.
Part 3: Enter the customer details:
- Shipping address (optional): verify that you require the customer's shipping address.
- Contact details: verify that you require the customer's phone number or email address.
Final step:
- Click Create Pay by Link to save your payment link. The Manage Pay by Links page appears.
- Click Cancel Create Pay by Link to return to the Manage Pay by Links page without saving your payment link.
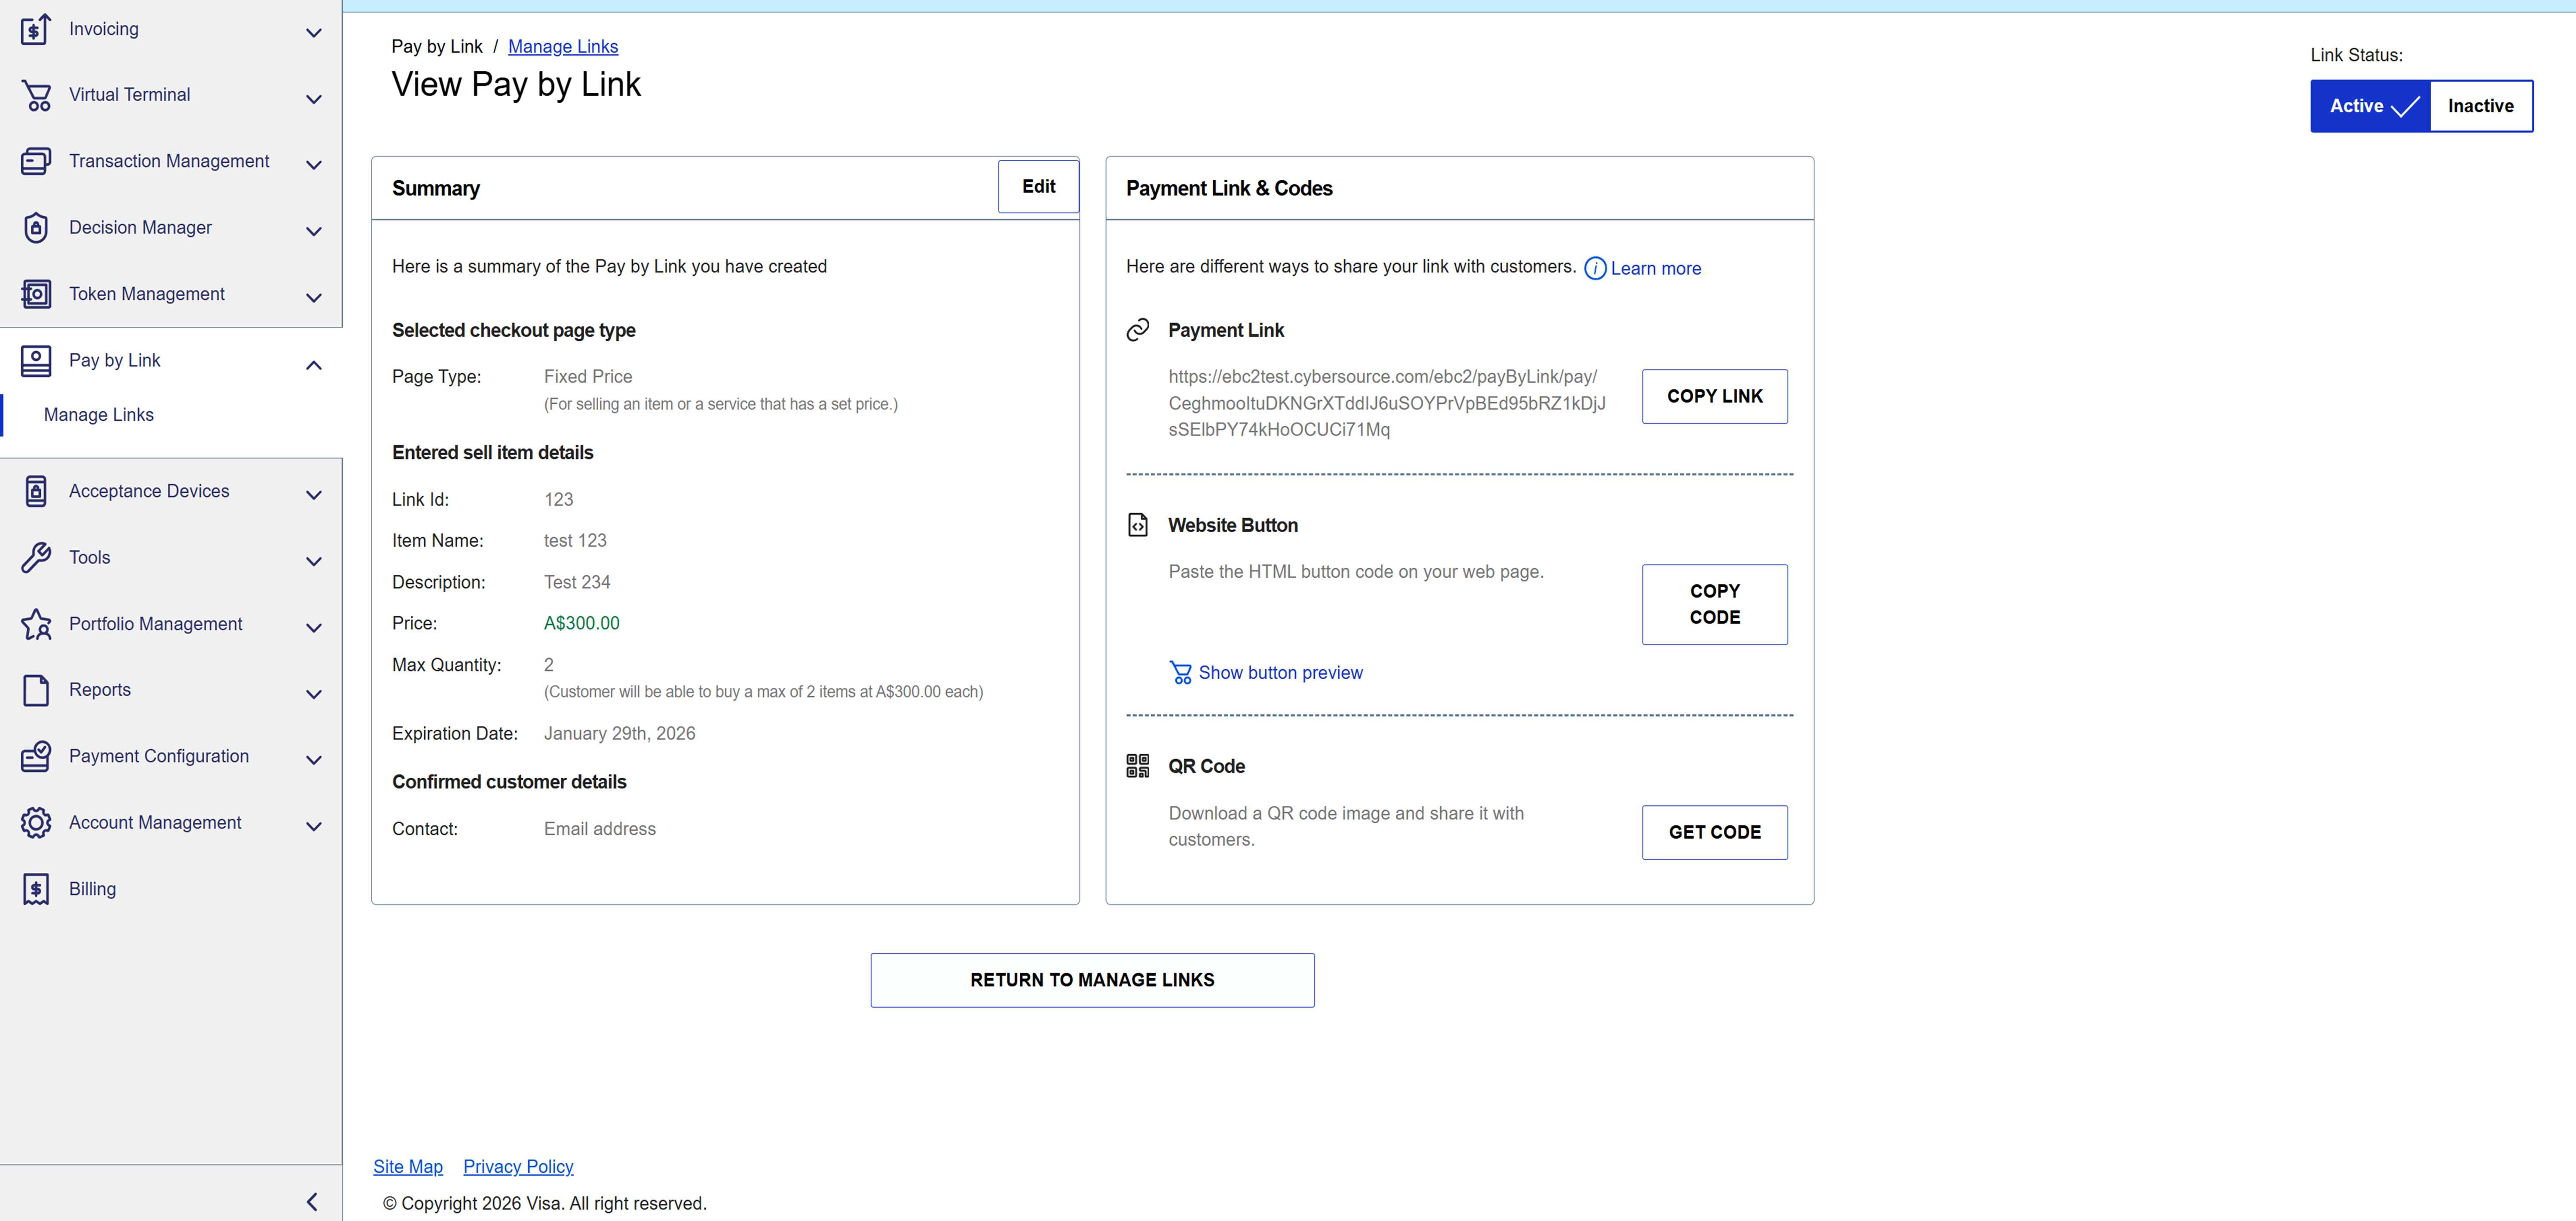
5. Viewing a Payment Link
You can sort payment links by item name, description, price, creation date, or status on the Manage Pay by Links page. You can view details of a payment link from the Manage Pay by Links page.
Follow these steps to view details of a payment link:
- On the left navigation panel, click Pay by Link
- On the left navigation panel, click Manage Links. The Manage Pay by Links page appears.
- Click the name of the link that you want to view.
- Choose a method for sharing your link with customers:
- Payment link: click Copy Link to copy the payment link directly to your clipboard.
- Website button: click Copy Code to copy the website button HTML code to your clipboard and paste to add to your website. Click Preview Button to see how the button will display on your website.
- QR code: click Get Code to create and view a QR code. Click Download to download the QR code image and share it with your customers.
 6. Editing a Payment Link
Note: You can view and edit your payment links on the Manage Pay by Links page in the Business Center. Only links with an ACTIVE status can be shared with your customers.
7. Payment Link Expiration Date Management
You can configure an optional expiration date for a purchase or donation payment link to extend the expiration date for a new or an existing link. Managing payment link expiration dates improves security and reduces the risk of unauthorized payments on older payment links.
IMPORTANT
When a purchase or donation payment link expires, the status of the link does not automatically change from active to inactive. The link remains in its current state, but the expiration message appears when the expired link is accessed. When a customer attempts to access an expired purchase or donation payment link, they receive a message stating that the link is expired. The message also directs the customer to contact the business that issued the link.
The payment link expiration date that you configure is stored in GMT with a timestamp of 00:00 hrs. The expiration date that appears on the payment page for the payment link is converted to the payer time zone.
- The payer can make a payment if the local payer time is less than or equal to the converted expiration date.
- The payer cannot make a payment if the local payer time is greater then the converted expiration date.
IMPORTANT
Expiration dates were not automatically applied to existing payment links when this feature was released.
Pay by Link receipt links are no longer available after 30 days.
Popular Articles
Taking a Payment
With your mobile terminal, the following payment types and methods are accepted: Contactless payments (Tap & Go), chip insert and swipe Visa, Mastercard, American Express, and eftpos Google Pay, Apple Pay and Samsung Pay To take a payment, you will ...Taking a Payment on your PAX A920Pro
The following payment types and methods are accepted: Contactless payments (Tap & Go), chip insert and swipe Visa, Mastercard, American Express, and eftpos Google Pay, Apple Pay and Samsung Pay To take a payment, from the Standalone Payments Home ...When will I get paid?
Transactions processed before midnight will be paid within the next day, excluding weekends.Tipping
Tipping can be switched on or off by contacting customer support. Tip options of Round Up, two variable percentages (e.g., 5%,10%) and a custom amount are displayed on the Confirmation screen. Your customer selects a tip option and presses Add tip, ...How to start a shift
The first time you start a shift you must add the details of your Taxi ID and Driver ID by: 1. Select the account button in the top right corner of your terminal 2. Select ‘Start Shift’ Note: if this is the first time you have used your terminal you ...
Related Articles
Quick guide for CyberSource Invoicing
Overview Use the Invoicing feature to create invoices and share them with your customers. The Business Center sends each invoice to its intended recipient, so you need not build a payment form on your site nor worry about handling secure payment ...Magento Boarding Guide
Live Payments Setup for Magento Overview Magento is the free, open-source version of Adobe Commerce. It’s a flexible eCommerce platform that gives merchants control over products, orders, and payments. This guide provides configuration steps for the ...Prestashop Boarding Guide
Before You Start Before you attempt to set up the integration, please ensure you have/are using the following: From Live Payments Registration for an ‘eCommerce / ISV’ account If you are unsure whether your account is properly configured to support ...WooCommerce Boarding Guide with SkyVerge's plugin
Overview WooCommerce is a third party plugin that turns your WordPress site into an eCommerce store. Skyverge’s WooCommerce plugin uses Cybersource’s Flex Microform payment form, ensuring your page meets SAQ A PCI compliance whilst also providing a ...WooCommerce Boarding Guide with VISA Acceptance Solutions' plugin
Overview The following sections provide an overview of the plugin and step-by-step installation instructions for WooCommerce. Recent Revisions to This Document 26.04.24 Support for version 2.2.0 Update minimum requirement Update the download URL from ...